
Send Arbitrary Messages to any Channel or User in Slack from Claris FileMaker via the Slack API
This post is part of a multi-part series that focuses on specific examples of how to connect Claris FileMaker to Slack. This article will make more sense if you have read our introduction, and we invite you to dive into the whole series:
Slack FileMaker Integration Overview
FileMaker + Slack: A Claris Connect Integration
FileMaker + Slack: A Simple API Integration
FileMaker + Slack: Putting It All Together
Share Messages into Slack
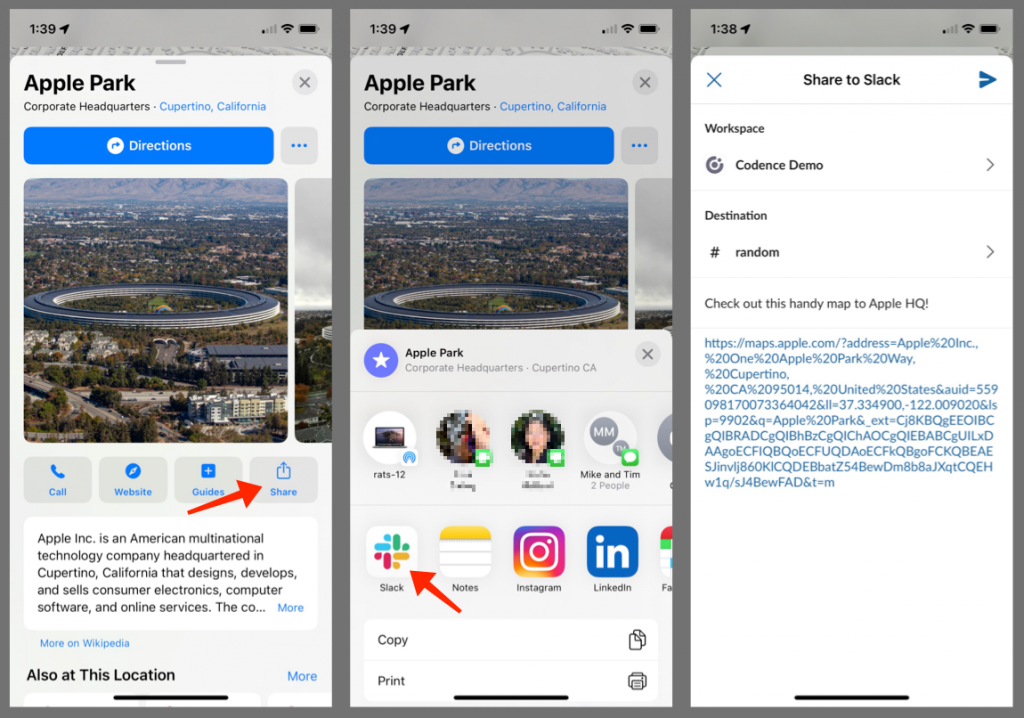
If you use Slack, you no doubt have seen it included in sharing functionality on iOS, Macs, Windows, and Android. It’s incredibly helpful to view a piece of content, tap Share, choose Slack, and then post a message into your workspace.
At Codence, we eat our own dog food – we’ve created a custom CRM on the Claris platform and work with it every single day. It is tailored to our business and, more importantly, constantly evolves. We live and breathe on Slack as well. Marrying the two was an obvious benefit for our team.
Slack FileMaker Integration
We’ve created a series of blog posts to help explore various ways in which you can tie Slack with Claris FileMaker. We may add more over time as well. Take a look at the whole series, and let us know if you have feedback, questions, or would like to explore having Codence build an integration for you.
The Idea
Our CRM supports exploring work with potential new clients. As you might imagine, there’s quite a bit of internal communication during the sales process as we loop developers and tech leads into conversations, schedule meetings, and put together proposals. Much of that communication happens within the FileMaker application, but obviously, a lot goes on in Slack as well. We wanted to share links from FileMaker just as any other application might – with the option to choose a channel, compose a message, and post.

Getting Started
Integrations can be tricky and experience has shown that what looks easy at the start can often get sidetracked by unanticipated complexities. Our initial perusal of the Slack API documentation revealed a rich API with all sorts of functions, but we knew going in that it would take some time to wade through the documentation, AND get the authentication correct, AND find the right functions, AND make some mistakes along the way, AND there were likely going to be other pitfalls that we didn’t even know about yet (sigh…). We weighed the potential development time against the projected time savings and downright awesomeness of having the whole process in our custom FileMaker application and decided to dive in.
The Punchline
If you want to skip ahead to see what we built, take a look at this short video of our finished application in operation.
The Technologies
You will need three separate pieces of technology to make this work:
Slack App
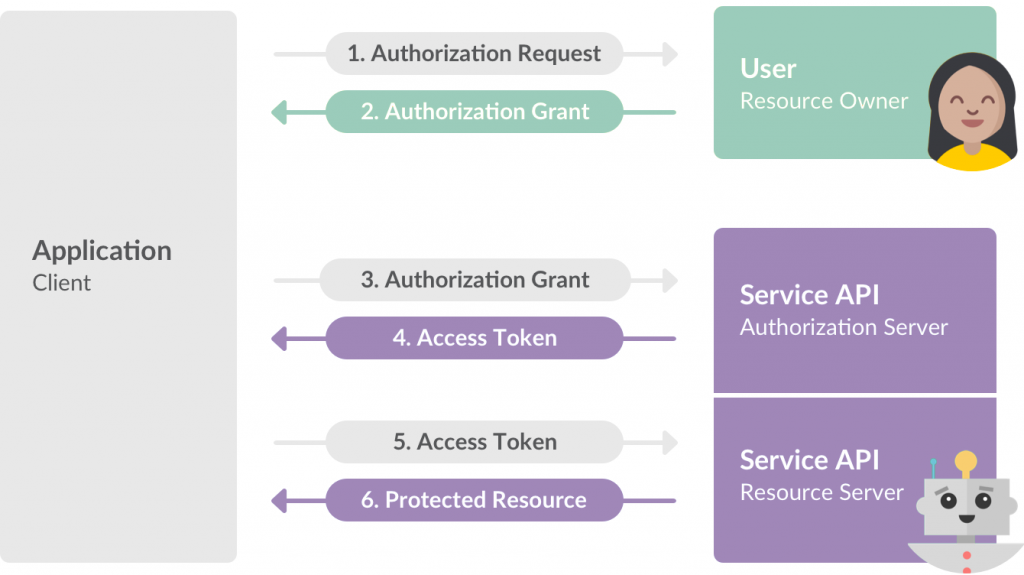
The modern Slack API isn’t bolted directly onto Slack, instead, you need to deploy a Slack App in your workspace and your external application will communicate with the Slack App. Thankfully, it’s pretty easy to deploy a Slack app and generate the necessary tokens to allow an external application to communicate with your workspace.
FileMaker scripting (and layout work)
There’s obviously going to be some work that we need to do inside FileMaker from a user interface perspective, and of course, we will be leveraging the Insert from URL script step to communicate with our Slack App.
Authentication
Lastly, we will need to establish a trusted connection between FileMaker and your new Slack app. This trust connection will involve directing the FileMaker user to a web page where they’ll be asked to authenticate and authorize our FileMaker app to post to Slack on their behalf. We need to capture the Authorization Grant from this page in FileMaker as we’ll get a response and token from this authorization that we need to communicate with the Slack API. Slack will only allow this Authorization Grant to be sent to an HTTPS endpoint, so we need an HTTPS endpoint that redirects to our FileMaker Server. We found a creative solution to this problem with a simple web page redirect that we wrote in Javascript, but there are undoubtedly other ways to approach it.

The Slack App
Creating and configuring your Slack App is the first step. In your browser, navigate to api.slack.com and select “Your Apps”. From this page, select “Create New App” and choose “from an app manifest”. You can certainly build out your app from scratch, but the (currently beta) feature of using a manifest is much easier.
App Manifest – “Manifests are YAML-formatted configurations bundles for Slack apps. With a manifest, you can create an app with a pre-defined configuration, or adjust the configuration of an existing app.” Reference: Slack API Documentation
We used one of the example templates to spec out our own app manifest using the recommended YAML below. We recommend that you copy and paste this text into your app manifest, you’ll then need to make some minor edits as described below.
_metadata:
  major_version: 1
  minor_version: 1
display_information:
  name: FM Slack Integration Demo
features:
  app_home:
    home_tab_enabled: true
    messages_tab_enabled: false
    messages_tab_read_only_enabled: false
  bot_user:
    display_name: FM Slack Demo
    always_online: true
  shortcuts:
    - name: FM Integration
      type: global
      callback_id: fm_integration
      description: FM Integration
oauth_config:
  redirect_urls:
    - https://fms.example.com/redirectURL.html?protocol=fmp19&host=fms-test.codence.com&file=FilemakerSlackIntegration&script=Slack | Get User Token
  scopes:
    bot:
      - channels:read
      - chat:write
      - groups:read
      - im:read
      - mpim:read
      - team:read
      - usergroups:read
      - users:read
      - incoming-webhook
      - commands
settings:
  interactivity:
    is_enabled: true
    request_url: https://34h3b9.apps.connect.claris.com/api/hooks/v1/catch/slack/42ed6hPge
  org_deploy_enabled: false
  socket_mode_enabled: false
  token_rotation_enabled: false
We won’t go into the details of this manifest but do pay attention to the user scopes, and the redirect_urls sections. The user scopes define what our application can and can not do in our Slack workspace. In this case, we want to be able to read (only) groups, users, channels, and usergroups, and we need to be able to write chats and files (our Slack message content).
Note that the redirect URL is an HTTP request and “https” is the only protocol allowed for these redirects. That’s where our third piece of tech fits in, we need an http endpoint that can take our payload and redirect it to our custom FileMaker application so that we can capture the results of the oAuth authentication process. We will take a look at that code below.
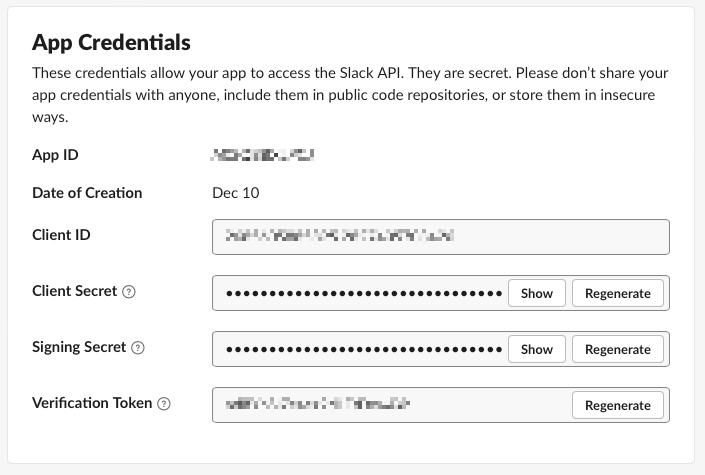
You’ll also want to take note of the App Credentials in the Basic Information section of your App configuration page. Specifically, you’ll need the Client ID and Client Secret to communicate with the API. Once you have these values, add them to the demo app in Slack Settings.
The Redirect URL
As mentioned above, as part of the Authorization process, we configure a redirect URL to handle the response of the authorization request as part of our (Slack) app manifest. The manifest allows only an HTTPS endpoint to be configured and we need to have our FileMaker app handle this response. One way to handle this is to host a web page that can redirect this HTTPS request to an FMP URL. We wrote a small bit of JavaScript to do just that.
We chose to host this page (redirectURL.html) on the same server as our FileMaker server, but you could really put it anywhere. You’ll need to add the path to this file to the redirect_urls: section in your manifest. Note that this code as written expects that you pass the relevant parameters as indicated by the variable declarations at the top. In short, if you configure your manifest “redirect_urls” as above, and host this page below as written, you should be good to go.
<script>
// all these parameters must be passed to the endpoint
var protocol = getParameter("protocol"); // protocol in our case will be 'fmp19'
var host = getParameter("host"); // the ip address or hostname of your FM server
var file = getParameter("file"); // the name of your FileMaker file
var script = getParameter("script"); // the name of the FM script that handles the response
var code = getParameter("code"); // the response code from the authorization request
// our redirect URL is assembled here
window.location.href = protocol + "://" + host + "/" + file + ".fmp12?script=" + script + "¶m=" + code;
// parsing the parameters
function getParameter(paramName) {
var searchString = window.location.search.substring(1),
i, val, params = searchString.split("&");
for (i=0;i<params.length;i++) {
val = params[i].split("=");
if (val[0] == paramName) {
return val[1];
}
}
return null;
}
</script>The FileMaker App
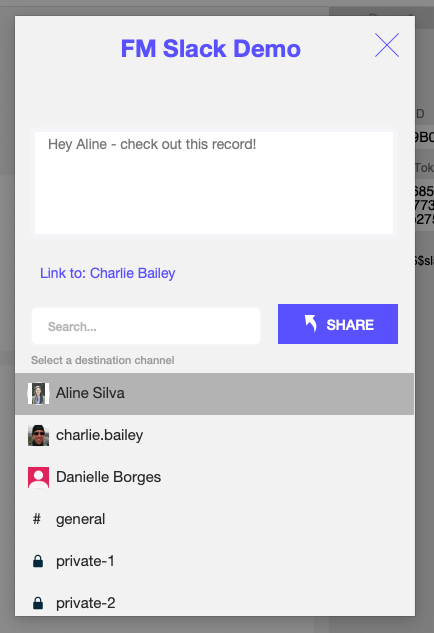
All this work, and we still have nothing to show for it! Now we get (finally) get to the cool part. If you’re wondering where we are headed, fire up just about any app (Safari?) on your iPhone or iPad and tap the Share button (the box with the arrow pointing up). Select Slack from the selection of apps and you’ll see a dialog like the one below:
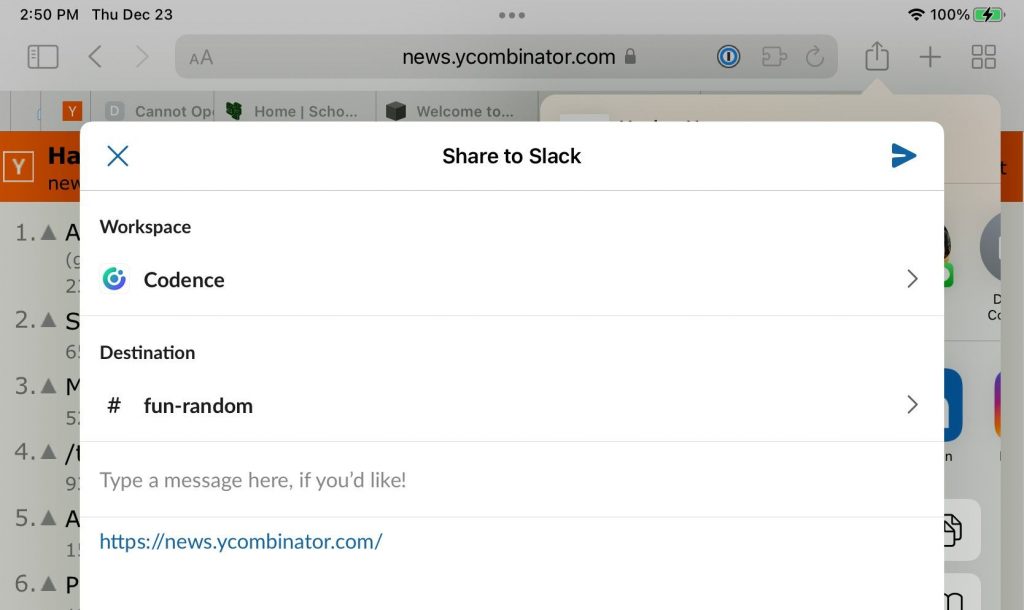
Our use case is to replicate this functionality in a way that users find intuitive and convenient. The key elements of this dialog that we want to reproduce in our custom FileMaker application are the destination (channel) selector, the message box, and the link to the artifact that we want to share. (We won’t worry about the Workspace selector as we’re going to assume that we want to connect our FileMaker application to a specific Slack workspace.)
For the Destination, we want to present a filterable list of all the possible destinations that the specific FileMaker user has access to. This should include all public channels, all private channels that the user is a member of, and all current users in the Slack workspace. This is of course all predicated on the idea that we know who the FileMaker user is and that they have granted access to the Workspace for the Slack App that we configured above. So let’s start there: let’s connect our FileMaker user to a specific Slack user and grant the Slack App the privileges to post into the Slack workspace as this user.
Authentication
We’re going to assume that your FileMaker application has some type of user management system in place where each user of the system has their own account for access into the system. This account can be a FileMaker account or you can leverage any external authentication system that you choose.
The important part is that we are uniquely identifying the current user of the system. In our case, we have a record in a Users table for each of our system users. It’s handy to have an actual data record for each user to store preferences and, in this case, their Slack user ID and access token. By storing these tokens in the FileMaker system, it means that our round trip authentication process only needs to happen once for each user.
While we didn’t do it in the demo, it would make sense to employ record level access privileges in your solution to ensure that users are strictly forbidden from seeing tokens other than their own.
In short, our authentication process looks something like this:
- Does the currently logged in user have a Slack token on file? If yes, then proceed with sending a message to Slack. If no, let’s authenticate this user and get a token.
- Make a request to https://slack.com/oauth/v2/authorize including the necessary scopes and client ID.
- If the user cancels that process, nothing should happen, but if they complete the authorization at the above URL, they’ll get redirected back to FileMaker (via our redirect page) and we will run the script that we configured in the manifest. That script (“Slack | Get User Token”) should capture their Slack User ID and token and write it into the appropriate user record.
Expanding on item (2) above, take a look at the script “Slack | Connect Demo to Slack – Authentication”.
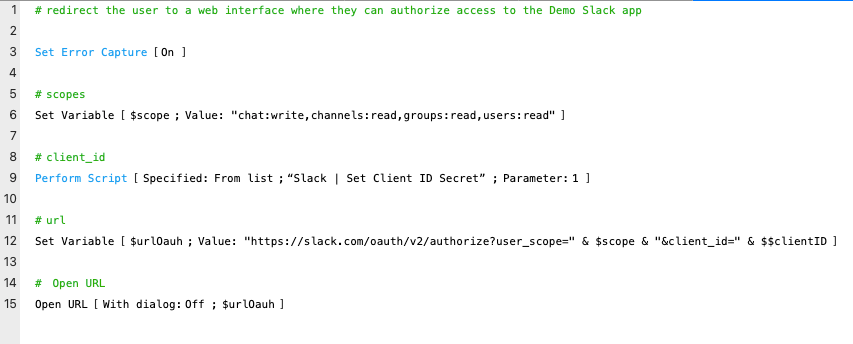
Note the scope definition, we’re asking for the user to allow the Slack App to read groups, users, and channels, and write to chat. Note also that we need to supply the client_id which is the ID of our Slack app defined above. Once we execute the Open URL script step, we have effectively handed off to the external application and are expecting either nothing if the user cancels the process in the external app, or we’re expecting that external app to perform a callback (via our special endpoint) and run a FileMaker script.
When we send the user to the authorization URL, the user is presented with this authorization request (once they authenticate with their Slack credentials):
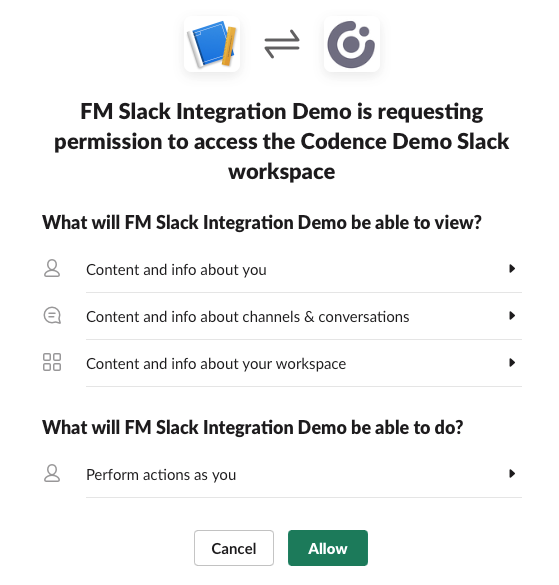
If the user clicks the Allow button, they’ll be redirected back to FileMaker and we’ll be grabbing their Slack User ID and Token. Capturing these values is a two step process where we are first passed a code which we can use to request the User ID and Token from the API.
Once we have the Slack User ID and Token stored in the user record, we don’t need to go through this authorization process again, we will just use the token moving forward to interact with the API.
Retrieving Channels and Users
As is typical with integrations, the hardest part is often authentication. Once we can successfully authenticate to the API, retrieving data is usually straightforward. Slack is no exception. Retrieving a list of channels and users that the user has access to is a three step process because the Slack API has three different endpoints for this data. Check out the script “Slack | Get All” and the corresponding subscripts “Get Public Channels”, “Get Private Channels” and “Get Users” for details. The actual API requests are straightforward, the bulk of the parent script here is the parsing of the results.
For example, when we make a request for all the private channels the user has access to, you’ll get an array of JSON objects like the following: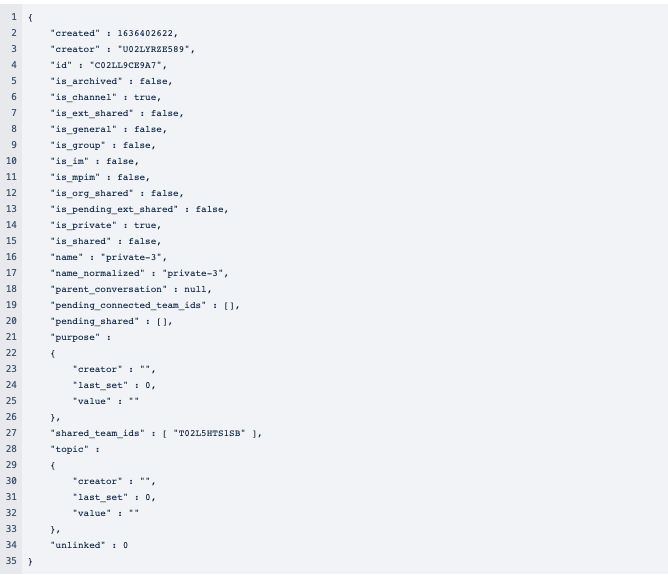
The most important parts for our purposes are the name and ID of the channel. The script “Slack | Get All” parses these three big arrays down into a single array that’s more manageable with objects that are a lot simpler: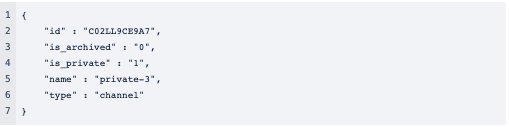
Armed with this list of users, public channels, and private channels, it’s now just a matter of displaying the data in a format that’s easy for the user to navigate. We will ask the user to choose a channel (or user), and then we will capture the ID of the chosen channel (or user) so we can post a message to the appropriate destination in the Slack workspace.
Aside: Using a Virtual List and an On Timer script
As we were designing this feature, we wanted to be aware of the security implications of what we were doing. Slack is both a public (at least within the organization) and private space. We knew we were going to store the Slack user tokens in our custom FileMaker app and we considered storing slack channels in FileMaker as well.
Ultimately, we chose to use a virtual list to display available channels and users – initially because we figured it would be more performant – because using a virtual list meant that we never needed to store the potentially sensitive list of private channels in FileMaker. Managing the security policies around who has access to which channels was going to be a pain!
Furthermore, we were going to need to constantly query Slack for the list of channels anyway since they get created all the time and users expect to see them in their interface, (even that channel they created just a few minutes ago!).
We won’t go into the technical details of the virtual list in this post, there are plenty of other places to learn about it. Suffice it to say that the list of records at the bottom of this dialog is using a Virtual List technique to display a filtered list of results which exist only in the global variable $$slackChannels.
Another aside → Installing an OnTimer script with an OnObjectModify script trigger!? This is a technique that we picked up from a blog post by Daniel Wood.
Suffice it to say that this is a technique that we use all the time, (especially with solutions running over a WAN connection), to boost performance. It’s probably not necessary here since all the data needed to display this list is local to the user session, but it’s such a common practice at Codence that we include it here.
Putting it All Together
If you want to use our demo file to try this out, follow these four steps for success:
- Configure a Slack App in your Slack workspace (you might need the assistance of your Slack administrator to perform this task).
- Host a web page with the redirect code so that the round trip authorization can actually be a complete, ah… round trip!
- Enter the values of your Client ID and Client Secret (from your Slack App) into the Slack Settings in the demo file.
- Click the Share to Slack button on the Demo 3 tab in the example file.
The Sky is the Limit
Connecting your custom FileMaker application to Slack has a few moving parts, and it can take some experimentation to get them all working together in harmony, but we think the effort is worth it. Our users love the intuitive and quick share to Slack feature that we built. And the Slack API is rich with features!
We have really just scratched the surface of what’s possible with FileMaker and Slack and we already have ideas for further integrations like “@ mentions” in our outbound messages, attaching files, and building out features to perform FileMaker operations from within Slack (like record creation).
Let us know what you build in your custom app; we would love to hear from you!
And of course, if you’d like help implementing this at your organization, please do reach out.

Built with you in mind
Speak to one of our expert consultants about making sense of your data today. During
this free consultation, we'll address your questions, learn more about your business, and
make some immediate recommendations.