

The number of online payments has more than doubled in the last 10 years and skyrocketed after the COVID-19 social distancing rules. As a company specializing in accounting, Codence has quite a few projects related to payment processing and reporting. One of our recent projects involved integrating the Authorize.Net payment platform in a FileMaker solution to process charges, refunds, and voids, and create and manage customer and payment profiles for secure payments. We took it even further and added card payments to a website that would process charges and pass customer and payment profiles to FileMaker.
We didn’t use any plugins for this integration — and wanted to share our experience to demonstrate how powerful the Authorize.Net API is. With just a few Insert from URL script steps, you can transform your FileMaker database into a payment processing platform with extensive reporting features, customer profiles, and more.
Getting started with Authorize.Net
While there are a lot of companies that can offer online payment processing, Authorize.Net was among the first pioneers in this field. Small businesses looking for a reliable payment solution can’t go wrong with this trusted digital payment platform backed by Visa. Authorize.Net has been around for more than 20 years offering a flexible and easy-to-work with API that we will explore in detail in this blog post. There is also a sample file that you can download to see one of the API calls to Authorize.Net in action. Keep in mind that it will work only with FileMaker 18 or higher.
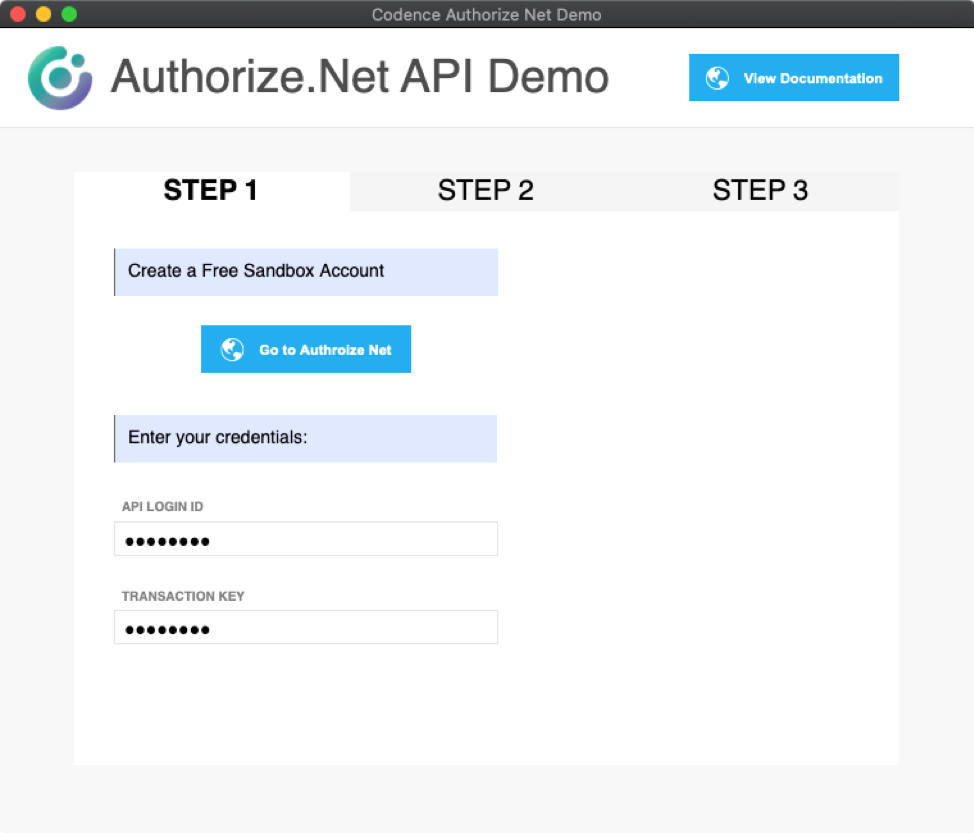
Whether you want to integrate Square, Stripe, PayPal, Clover, Authorize.Net, or some other credit card processor into your FileMaker solution, the first steps will be almost identical for all platforms. To get started, you need a free sandbox account and a set of credentials. Once you have an API login ID and transaction key, you are ready to start.
Processing your first payment
The sample file that you can request below has everything needed to process a test charge and view the Authorize.Net API in action. As you’ll see, the credit card charge can be done in just a few lines of code.
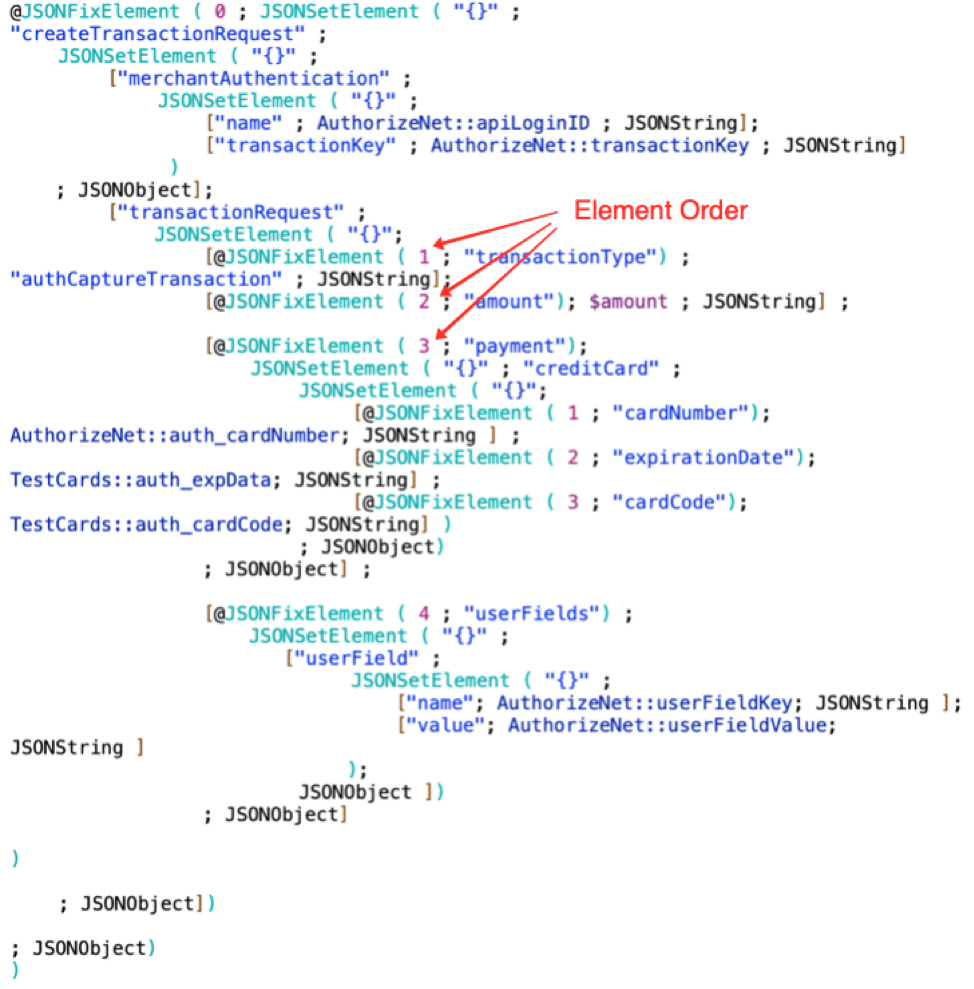
Before we start talking about the process in greater detail, it’s worth mentioning the role of the While function that was introduced in FileMaker 18. This little function is what makes the whole integration easier. A reason for this is that Authorize.Net does not offer a Rest API like most companies. For a long time, they only offered XML calls but in 2014, added JSON support though a translation of JSON elements to XML. This wouldn’t be a big deal, but unlike JSON, XML can require strict ordering of elements.
Here is where things get a little complicated because a JSON object is an unordered set of name/value pairs. When you use the JSONSetElement function in FileMaker, the nested key-value elements won’t appear in the same order as you listed them. Rather, they will be ordered alphabetically by key name. This is usually not an issue with Rest APIs, but with the Authorize.Net API, you need to force the ordering of the elements. While we’ve seen other alternatives to this custom function, we would highly recommend taking advantage of the @JSONFixElement if you have access to FileMaker 18. The trickiest part is to construct a nested JSON and force the order of the elements, but since all the calls to this API follow the same pattern, you can use the code we wrote as a template to charge a payment profile, process a refund, or void a transaction. All you’ll need to do is to change, add, or delete some of the key/value pairs to make it work.
We would recommend you construct all calls in the data viewer first and use the JSONFormatElements function to make the output more readable. We also included Authorize.Net test credit cards in the sample file to simplify the testing process.
How to use customer and payment profiles
If you want to build an application that can process payments in the future or on a repeating schedule, you’ll want to learn about customer and payment profiles. We would like to avoid storing credit card information in our FileMaker application, and the Authorize.Net payment profile feature is the way to go.
Authorize.Net gives us the ability to create a customer profile during transaction processing or we can directly create a customer profile for future use. The response of either call will contain customer and payment profile information that can be parsed via the JSONGetElement function. You can safely store these values in your database and use the charge payment profile call anytime you need to process another payment for this customer. The customer profile will have all the information about this customer including email, billing address, and even custom defined fields (see the sample file). Authorize.Net allows adding any number of your own key-value pairs that will be visible in your admin console or copies of the receipt and reports. We have used this feature to pass the order ID from FileMaker to make the search process easier, and there are undoubtedly many use cases where this feature might come in handy.
While each customer can have only one customer profile, payment profiles are an array of values related to each customer. You can add an additional payment profile or delete an old one. If you want to experiment with new API calls, try the handy interactive console where you can enter your sandbox credentials and play with other features of the Authorize.Net payment platform.
Take it further
There are so many other features you could add to make this payment solution truly your own. For example, you could save all payment and customer profiles in a separate table tied to a customer table by Customer ID and process payments on demand. You could have a separate table for payments that would store all transaction information including the last four digits of the card to make the refund process and reporting a breeze. You could even request the official Authorize.Net receipts and store them in a container field as a part of an order record.
If you need help integrating Authorize.Net or some other payment platform in your payment solution, please don’t hesitate to contact us!

Built with you in mind
Speak to one of our expert consultants about making sense of your data today. During
this free consultation, we'll address your questions, learn more about your business, and
make some immediate recommendations.