
Google Maps features are divided between free ones, such as displaying routes between different points, and paid ones, which require the API, such as geolocation or geocoding. You can take advantage of all this with Claris FileMaker, understand how!
Some Claris FileMaker features are easier to understand than others. Web viewers, for instance, can be a difficult concept for new users to wrap their heads around. Those who have worked with them for years take their usefulness for granted, but when you are introducing someone to Claris FileMaker it can be hard for them to understand why you would want a web browser inside your database.
When teaching classes, I remember trying to describe the usefulness of web viewers and watching students struggle to get it, then I would show them how they could be used with Google Maps. That was when the light bulb would go on. Seeing how they could feed a customer’s address into Google Maps without having to switch to a separate web browser was a perfect example of a web viewer’s potential.
Google Maps integration is still a frequently requested feature for many databases. It’s something that is easy to implement and that you can build onto to add advanced functionality.
In this 3-part article, I will explain what Google Maps’ free features are, how to access the Google Maps API and how to use it.
Index
- Part 1: What’s included with Google Maps
- Part 2: How do I access the tools?
- What’s in the toolbox?
- How much does it cost?
- How do I get set up?
- Setup complete
- Part 3: How to use the Google Maps API
Part 1: What’s included with Google Maps
Google gives away a lot of things for free, but like any other business, its goal is to make money. The rule of thumb with Google Maps is that information displayed on screen is free, but information returned in a format that is easily parsable will come at a cost. For example, you can generate and display driving directions between multiple points at no charge.
However, if you want to enter those same points and have Google Maps return the distance between them, formatted as JSON you’ll need to pay.
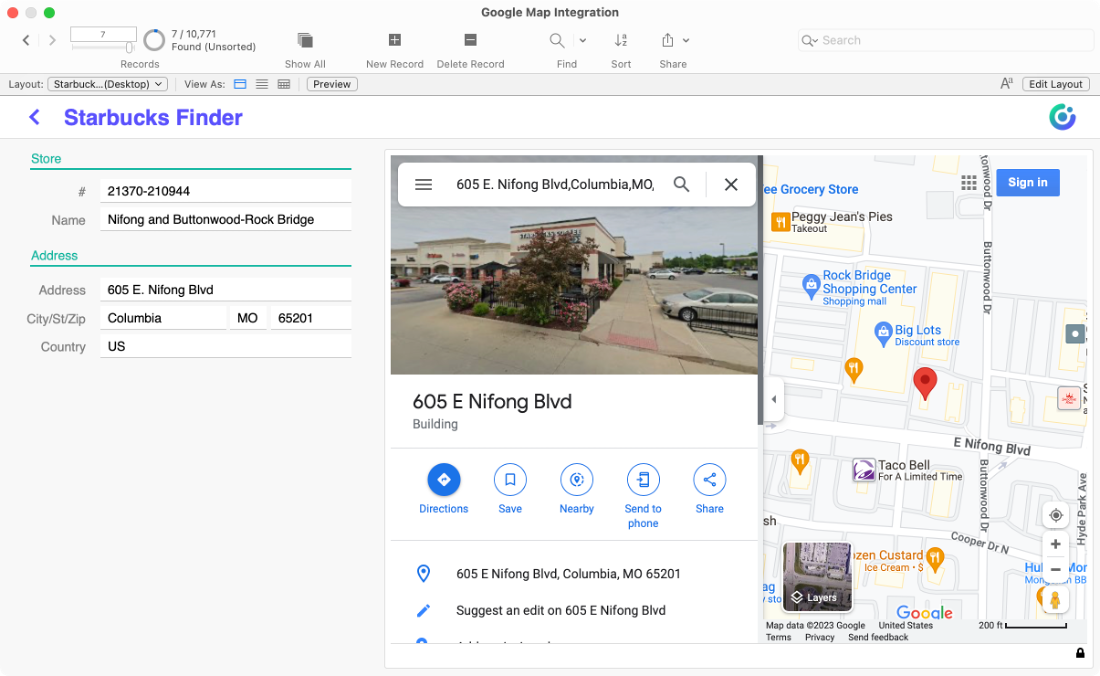
To illustrate these, I’ve downloaded a list of Starbucks coffee shops and loaded them into a simple Claris FileMaker database. This file is available to download so you can try it out for yourself.
Example 1 – Basic Mapping
We’ll start with a very simple example and one that Claris FileMaker practically writes for you. If you go into Layout mode, select the web viewer tool from the toolbar, and drag out a box on your layout, you will be presented with the Web Viewer Setup dialog, and you can select Google Maps (US) from the list of pre-defined examples.
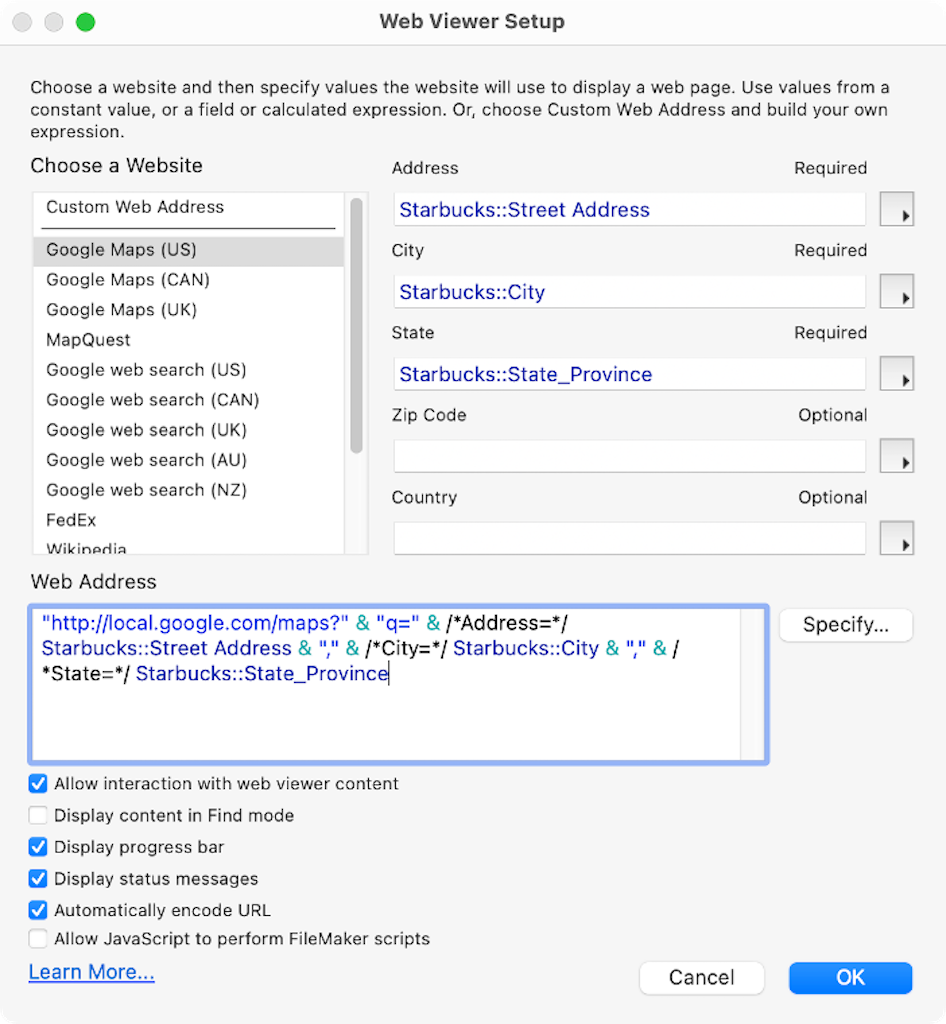
You will be presented with a list of data points you need to fill in to build the URL. Once you select the appropriate fields for Address, City, and State, hit OK, and return to Browse mode, you will see a Google Map for the address of the current record. It doesn’t get much easier than that.
I love that Claris FileMaker provides such an easy way for you to get started with Google Maps, but there are probably things you’ll want to customize to make it more useful. That’s easily done by learning a little bit about the Google Maps URL.
The Google Maps URL allows you to search, get directions, display maps, and show street view panoramas without needing to access an API.
As you read through the documentation, you may notice that the URL Claris FileMaker created for you used a different format than those shown in the examples. FileMaker added the Google Maps shortcut years ago, and the URL format has changed since then. Going forward, you should use the format specified in the current Google documentation.
It’s also more common to use ‘+’ instead of commas in the URL these days, so we should update that while we are at it.
You may also have noticed that I omitted the zip code and country when I was picking fields for the URL above. Google Maps doesn’t need those, and it’s best to leave them out so you can keep your URL as short as possible.
Taking these things into consideration, you should change the formula for calculating the web viewer URL in Example 1 from this:
"http://local.google.com/maps?" & "q=" & /*Address=*/ Starbucks::Street Address & "," & /*City=*/ Starbucks::City & "," & /*State=*/ Starbucks::State_ProvinceTo this:
"https://www.google.com/maps/search/?api=1&query=" & /*Address=*/ Starbucks::Street Address & "+" & /*City=*/ Starbucks::City & "+" & /*State=*/ Starbucks::State_ProvinceRead More: Integrate ChatGPT & FileMaker: Ultimate Guide
Example 2 – Driving Directions
Another useful thing you can do for free with the Google Maps URL is create driving directions. Let’s say that you are at your favorite Starbucks working hard on a blog post when they run out of almond milk. Obviously, you can’t work like this and you’re going to need to go to another Starbucks to finish the post. Fortunately, your database already shows other Starbucks locations in the same zip code, so it will be easy to create a script that feeds both addresses into Google Maps and gives you driving directions.
To make this easier, I’ve created a calculation field called “Map Address” that encodes the full address for me. The formula for it is:
Substitute (List (GetAsURLEncoded ( Street Address );GetAsURLEncoded ( City );GetAsURLEncoded ( State_Province));["¶" ; "+"]; ["%20"; "+" ] )
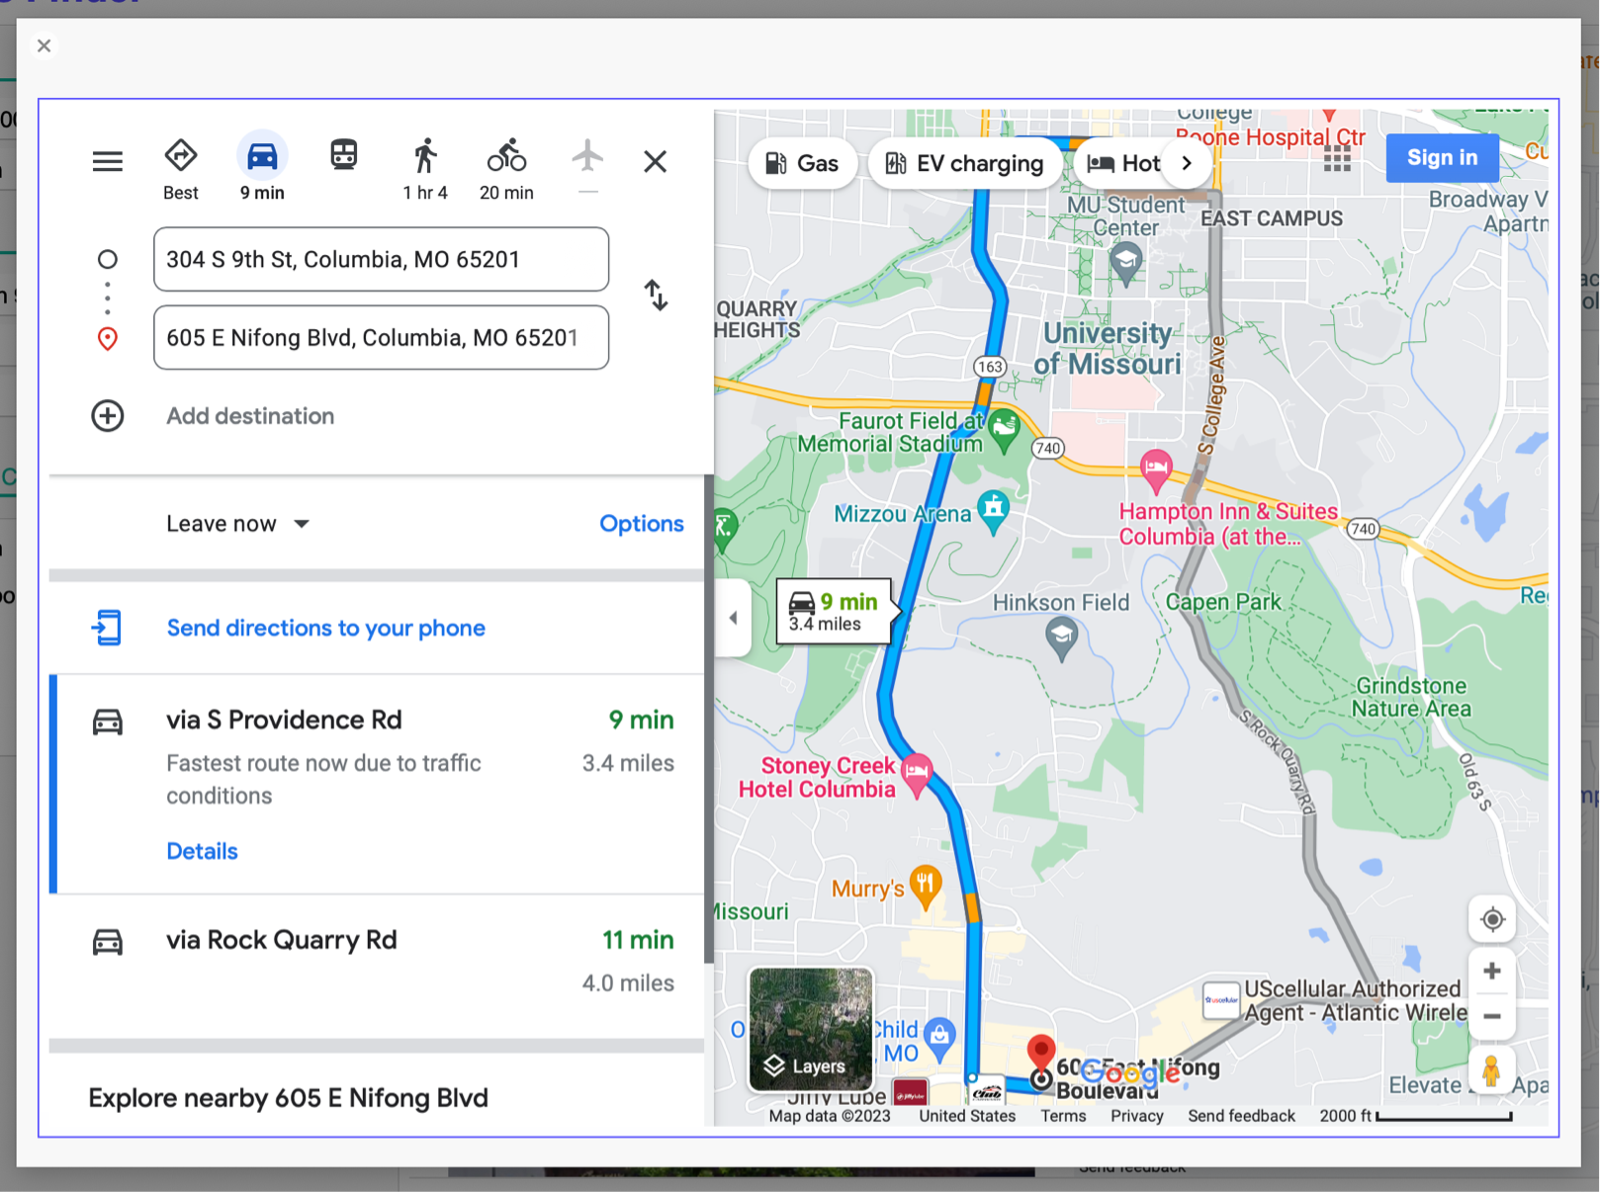
Based on what we see in Google’s documentation, the URL to display the directions between 304 South 9th Street Columbia, MO and 605 E Nifong Blvd Columbia, MO looks like this:
https://www.google.com/maps/dir/?api=1&origin=304+South+9th+Street+Columbia+MO&destination=605+E+Nifong+Blvd+Columbia+MO&travelmode=drivingI created a script to build this URL and feed it into a web viewer that opens in a card window so I have more room to view it like so:
Example 3 – Driving Directions with Waypoints
As I’m sure you are aware, Google Maps isn’t limited to creating trips between points A and B. When using the Google Maps URL to get directions, you can set as many stops on your trip as you like. The number of waypoints allowed varies by the platform where the link opens, with up to three waypoints supported on mobile browsers, and a maximum of nine waypoints supported otherwise. You should also note that, as with any URL, you must keep the total length of the request to no more than 2,048 characters.
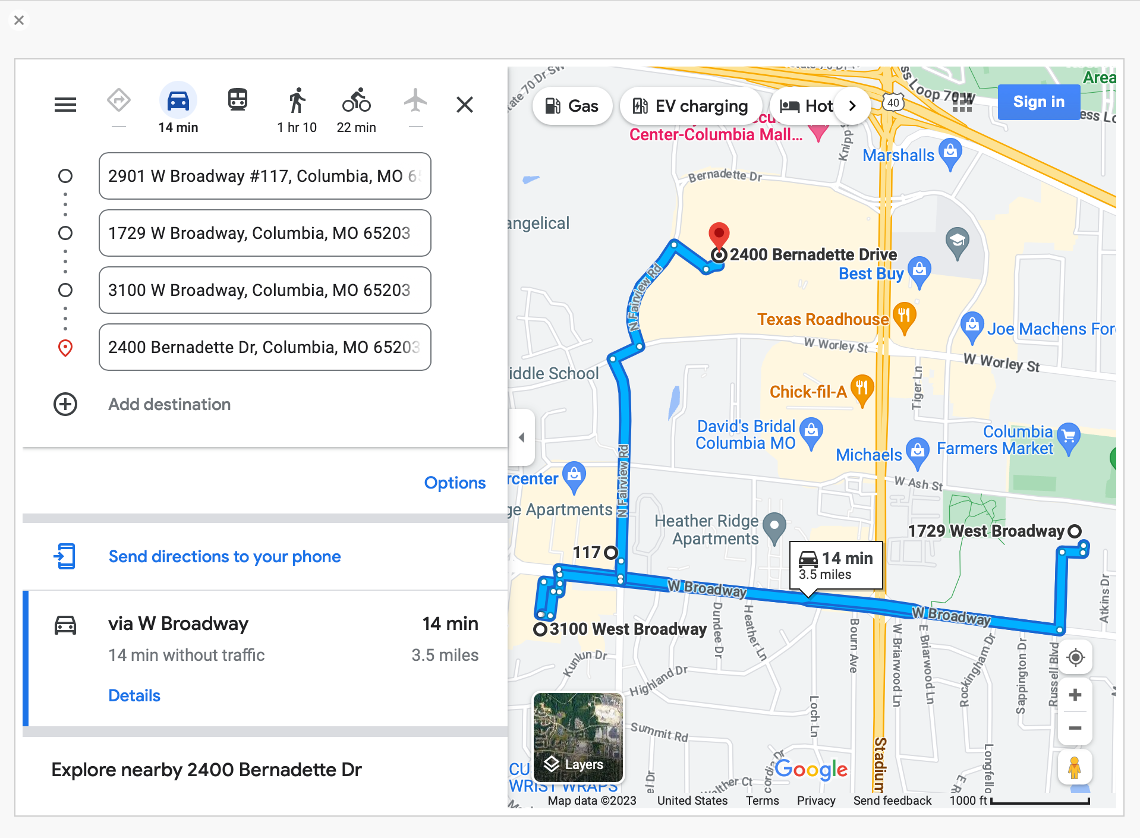
So, if you get bored and decide that you need to visit every Starbucks in a particular zip code, Google Maps can do that for you. All you need to do is specify the stops, in the order you want to visit them, as waypoints within your URL like so:
https://www.google.com/maps/dir/?api=1&origin=2901+W.+Broadway%2C+Suite+117+Columbia+MO&destination=2400+Bernadette+Dr+Columbia+MO&travelmode=driving&waypoints=1729+W+Broadway+Columbia+MO%7C3100+W+Broadway+Columbia+MO
As you can see, Google Maps provides a lot of value without charging you anything at all. It’s possible that accessing Google Maps through the URL will provide everything you’ll ever need.
However you may need additional resources such as the ability to convert addresses to latitude and longitude, calculate the travel time between points, or get real-time traffic information, you can tap into those with the Google Maps API.
Now ket’s understand how to access Google Maps API resources.
Part 2: How do I access the tools?
As I mentioned in part 1 of this blog, the free tools available from Google Maps are accessible by URL. The paid tools are accessible via an API you can interact with using the Insert from URL script step in FileMaker which will return results to you formatted as JSON. The free tools can be used anonymously through a URL, but accessing the API requires you to register for an account.
Read More: APIs That Fix Your Financial Data
What’s in the toolbox?
Google breaks down the tools available in the Maps Platform into three broad categories: Routes, Places, and Maps.
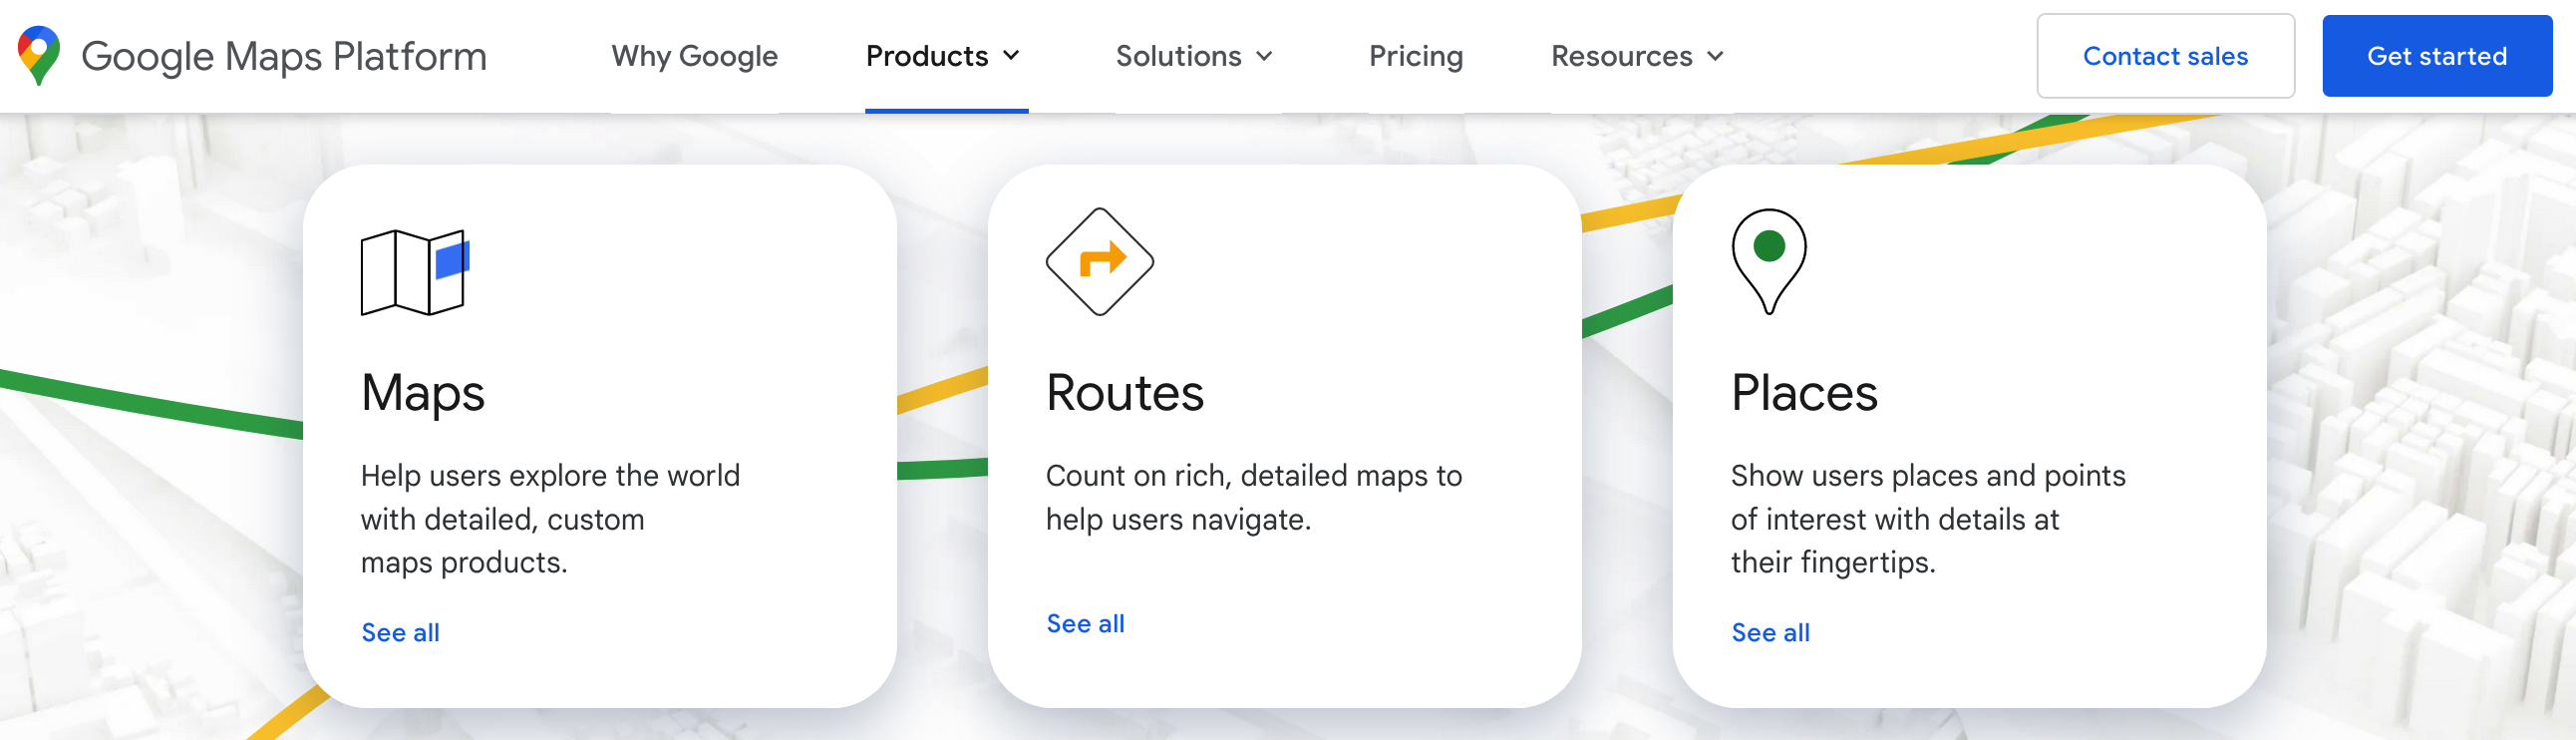
- Routes – Provides turn-by-turn directions that can include real-time traffic information.
- Compute Routes – Directions with real-time traffic between multiple locations
- Compute Routes Matrix – Travel times and distances for multiple destinations
- Directions – Directions for transit, biking, driving, or walking between multiple locations.
- Distance Matrix – Travel times and distances for multiple destinations.
- Roads – Determine the route a vehicle travels.
- Places – Gives you access to information about a specific place such as its address, latitude, longitude, time zone, or details about what is located there.
- Address Validation – Validate an address, standardize it for mailing, and determine the best geocode.
- Autocomplete – Automatically suggest businesses and points of interest as a user types.
- Current Place – Discover the place at a device’s currently-reported location.
- Geocoding – Convert addresses to geographic coordinates or the reverse.
- Geolocation – Return the location of a device without relying on GPS.
- Place Details – Add details for millions of places.
- Place Photos – Access place-related photos stored in Google’s Places database.
- Place Search – Return a list of places based on the user’s location, text query, phone number, or search string.
- Time Zone – Get the time zone for a specific latitude and longitude coordinate.
- Maps – Returns customizable static or dynamic maps as well as street views.
- Aerial View – Pre-rendered, 3D cinematic video of points of interest.
- Dynamic Maps – interactive maps using Cloud-based maps styling.
- Dynamic Street View – real-world imagery with 360° panoramas.
- Elevation – query locations on the earth for elevation data.
- Maps Datasets – Upload, store, and manage geospatial data to the Google Cloud console.
- Maps Embed – Add an interactive map or Street View panorama to your site.
- Static Maps – Return simple map images.
- Static Street View – Return a static Street View panorama or thumbnail.
For more information on each of these tools, you can check out the Maps Platform products page.
How much does it cost?
How much you pay for Google Maps depends on which tools you use and how much you use them. Each tool listed in the previous section represents a distinct API and is managed separately within the Google API admin console linked to your account. Each API is priced differently, with the cost to access a given API 1,000 times in a month ranging from $2 to $30. The prices also follow a sliding scale, with discounts for greater levels of usage.
Google provides every account with a $200 credit each month, and you won’t be charged anything until you go over that amount. That allows for a substantial amount of testing, but make sure you monitor your usage in the Google console so you don’t lose track or you may end up with an unexpected bill.
It’s important to note that the cost of using an API is not always based on how many times you call it. In some cases, it is based on the number of “elements” that you send to the API. Let me explain what that means:
Some APIs, like Geocoding, take a single location and return a single result. These are charged on a per-request basis. In the case of Geocoding, you pay $.005 per request for the first 100,000 requests.
Other APIs, like the Distance Matrix, allow you to submit multiple sets of origin and destination locations in a single request and receive results for each combination of origin and destination. Google refers to each origin/destination combination as an element and charges you based on the number of unique elements that can be created from your request. So, if you send a request with three origins and three destinations, the API will return, and charge you for, nine results.
Pricing for the Distance Matrix also changes based on the parameters that you send in your request. If you add a parameter, such as departure_time, that triggers the use of Google’s traffic model, the price will increase to $.01 per element. Make sure you research the costs of the various APIs thoroughly.
Each API in the Google Maps Platform has a Usage and Billing page within its documentation so you can figure out exact costs, but there is no substitute for a real-world test. Before you go into production, do a test run and then log into the Google Maps console to check the metrics for each API and make sure that your usage comes out as expected.
Read More: Top 9 Data Visualization Trends for the Next Few Years
How do I get set up?
Getting set up to access the Google Maps platform requires several steps, but if you’ve used any Google services in the past you may already have some of them completed. If so, some instructions below may not apply to you.
You’ll need to make sure you’ve accomplished the following tasks before you can access the Maps Platform:
- Create a Google account.
- Enable access to the Maps Platform from your Google account.
- Set up a billing account and payment method.
- Create an API Key that can be used to access the Maps Platform APIs.
- Set up restrictions to prevent unauthorized usage of the API Key.
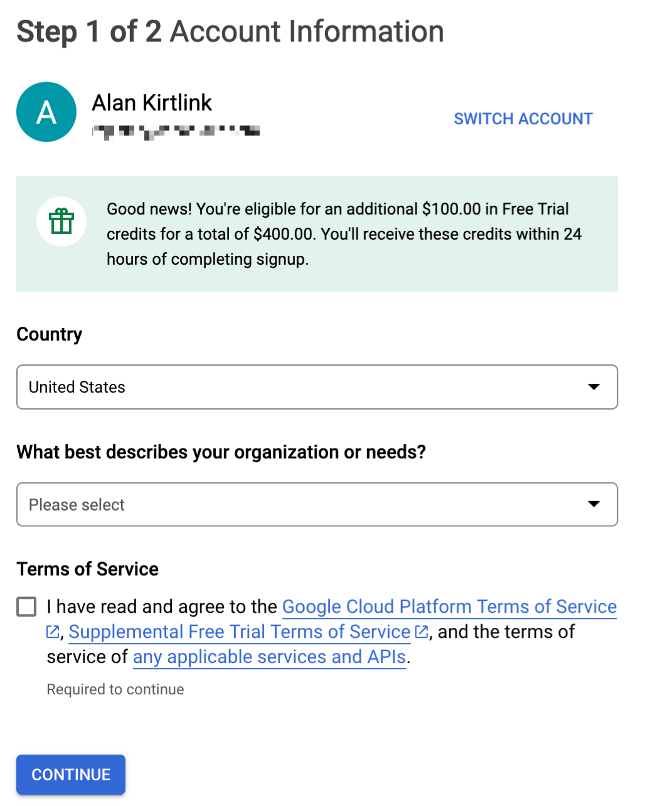
Sign Up for a Google Maps Platform Account
- Open your web browser and go to the Google Maps Platform website;
- Click on the Get started button;
- If you are already signed in to a Google account in your browser, you’ll be asked to accept the Google Cloud terms of service, if not, you’ll be asked to create a Google account.

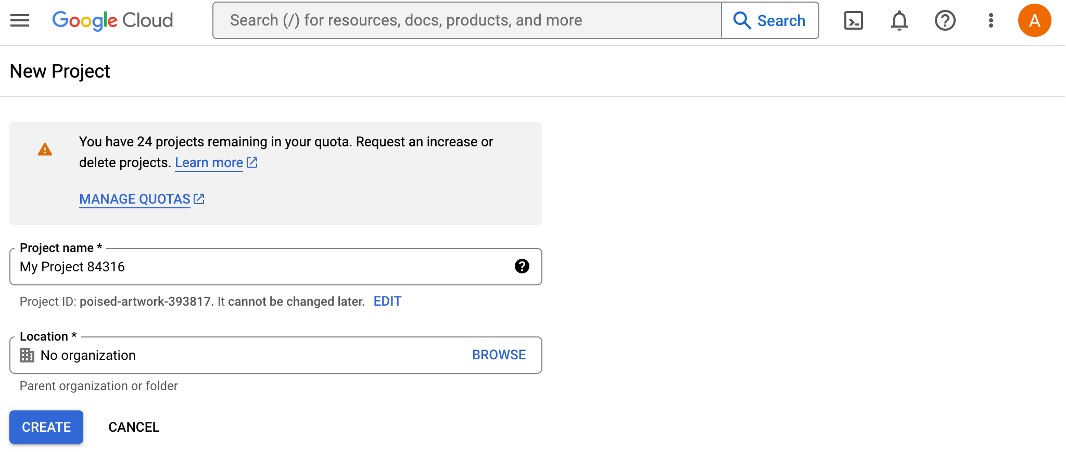
Create a New Project
- If you have never set up a Google Cloud project before you will be asked to create one automatically, otherwise you can type “create a project” in the Search box at the top middle of the screen.

- Enter a name for your project.
- Click the CREATE button.
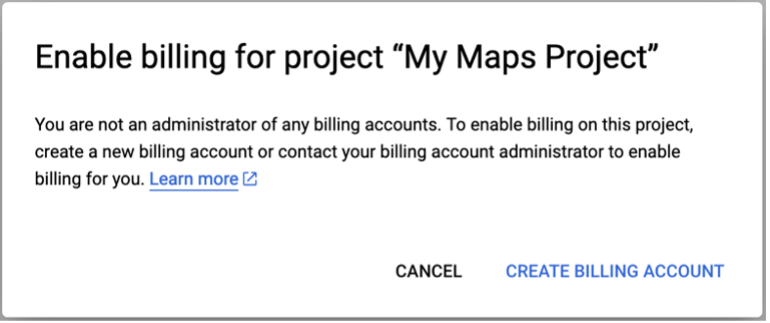
Set up a Billing Account
- If you don’t already have a billing account associated with this Google account, you will be asked to create one and enter a method of payment.
- Be sure to put restrictions in place later in the setup process to protect against unauthorized use.
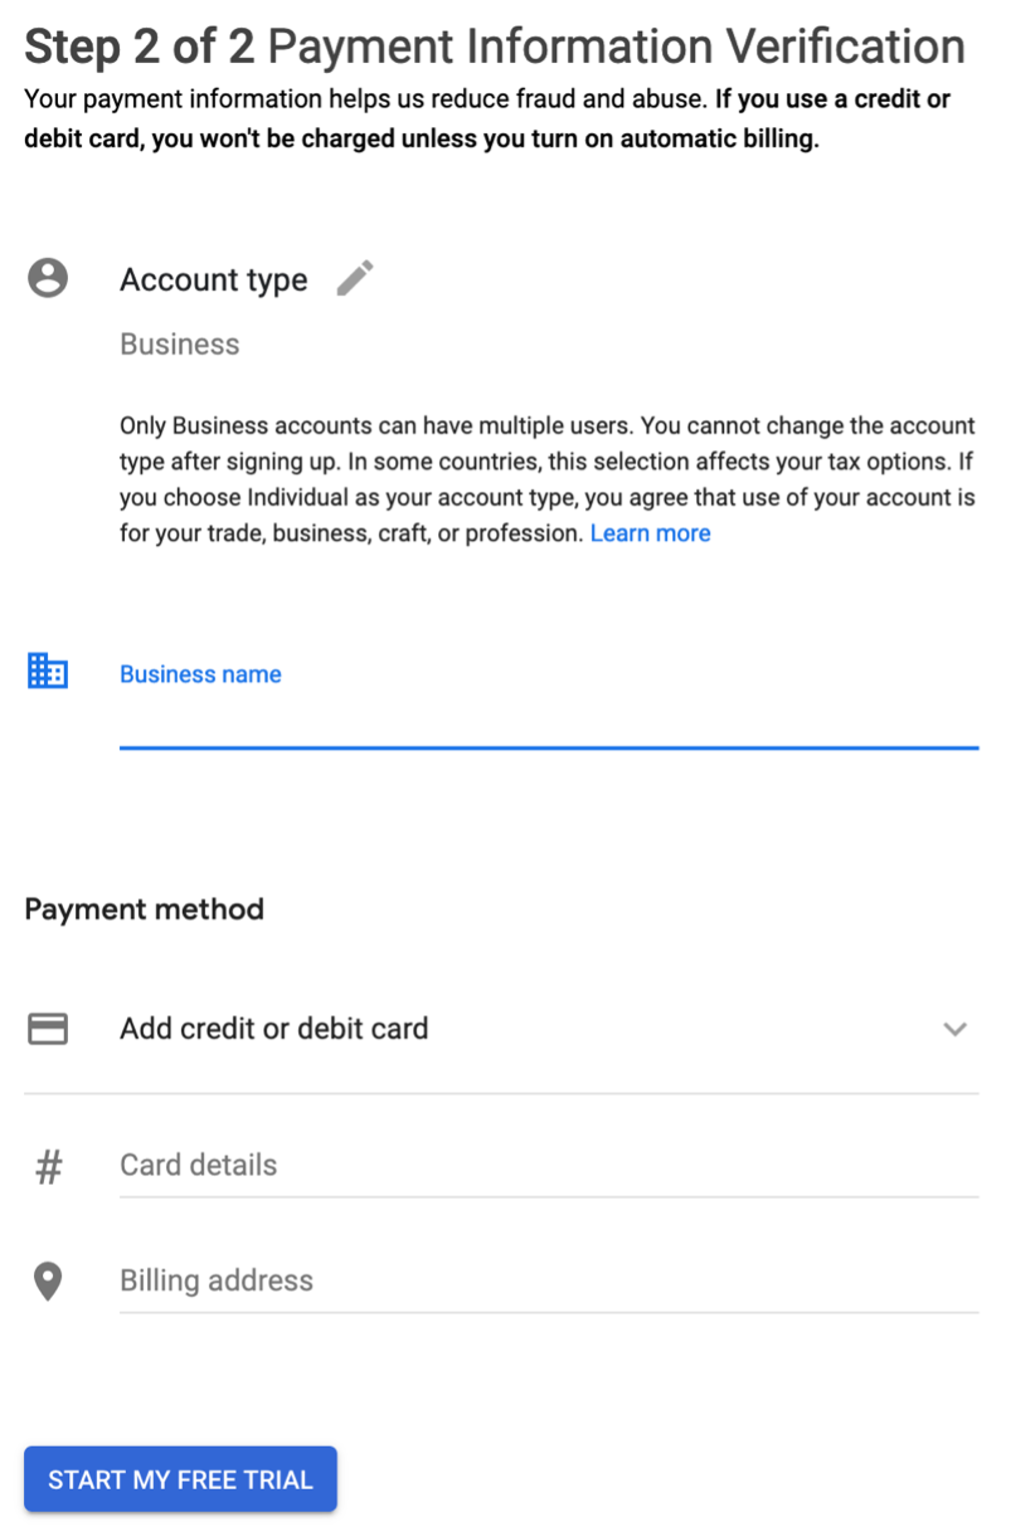
Create an API Key
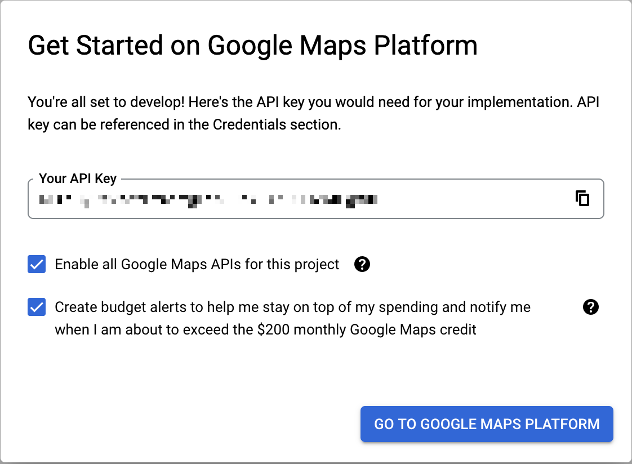
Once you’ve entered your billing information, you will be asked to generate an API Key which will be used to control access to the various APIs within the Maps Platform. You can restrict which APIs can be accessed by a particular key, but for simplicity, we’ll start by allowing all APIs to be accessed through a single key.
Take note of the API Key and keep it handy, as it will be needed to access the APIs used in the examples.
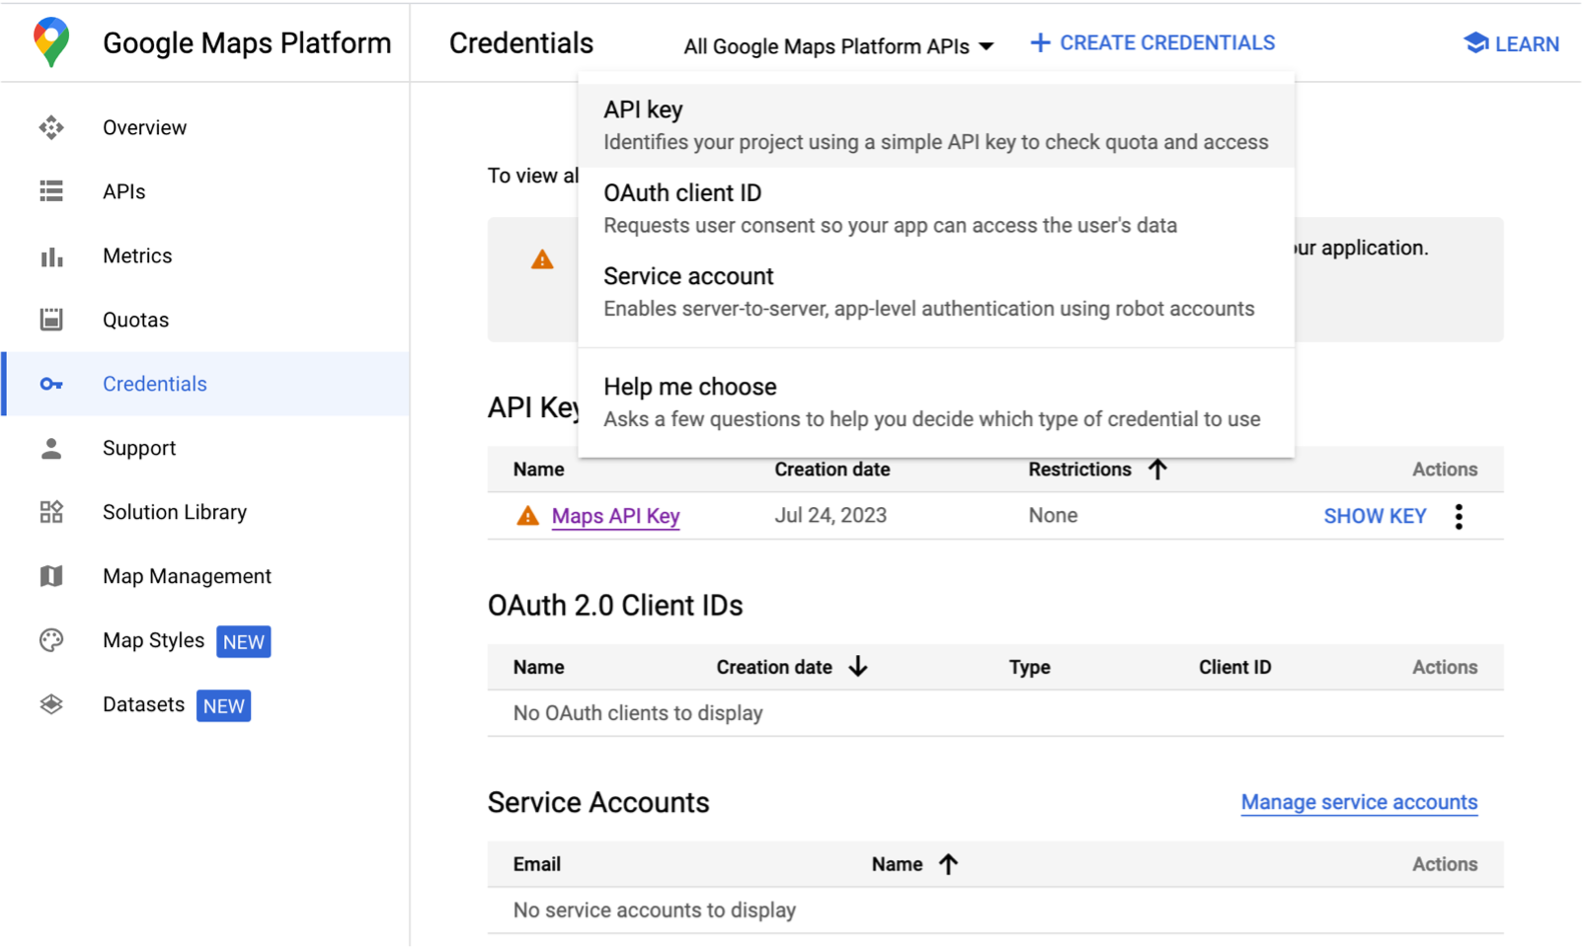
If you aren’t automatically asked to generate a key, you can create one manually by clicking on Credentials in the left-hand navigation pane and then clicking Create Credentials and selecting API Key.
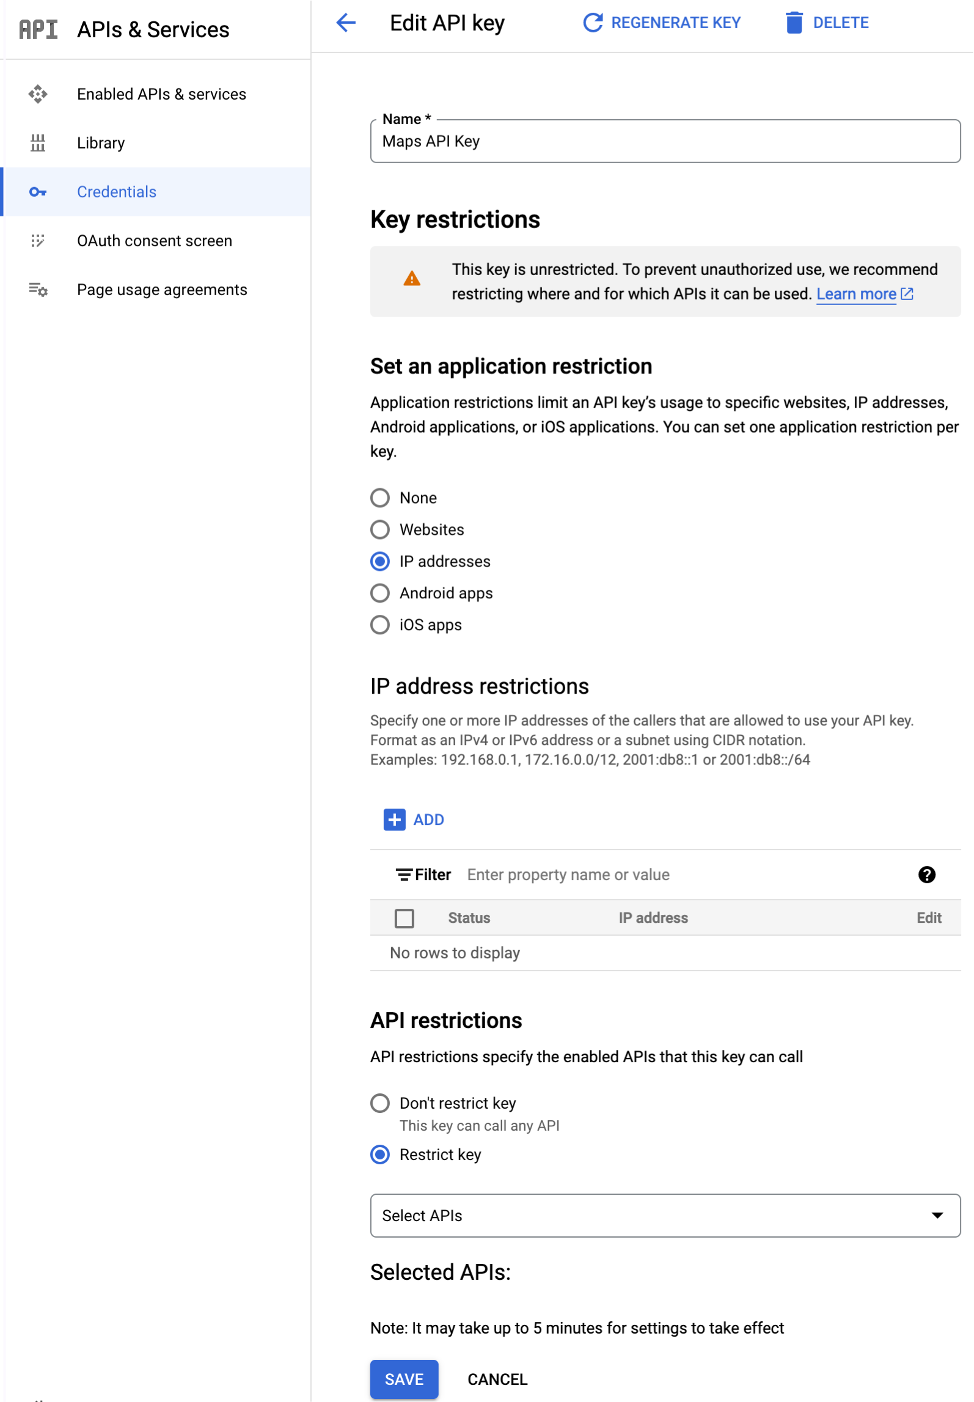
Set up restrictions on the API Key
Once you have the API Key set up, it is highly recommended that you put restrictions in place to prevent unauthorized use. For instance, you may want to limit access to your FileMaker Server’s IP address and then have all your requests run from the server using perform script on server. This is an optional step but since unauthorized use could result in a huge charge being sent to your credit card it is worth the extra time to set it up.
Setup complete
Let’s take a moment and appreciate how much work it was to get everything set up. Pat yourself on the back, you deserve it. All this setup can be a bit of a barrier to usage, but now that you have it completed, you are ready to start integrating the Google Maps API with your database.
Read More: FileMaker and WooCommerce Integration
Part 3: How to use the Google Maps API
Now I’ll show you how to use the Google Maps API to get coordinates and driving directions for addresses in your FileMaker application.
Geocoding API
I’ll start with a simple API that also happens to be one of the most useful, Geocoding. The Geocoding API takes a mailing address and returns latitude and longitude or vice versa.
Having latitude and longitude for an address opens a lot of doors. Once you have these you can:
- Shorten the length of the URL you send to the Google Maps URL so you can fit in more destinations.
- Calculate the distance between two locations.
- Simplify calls to other Google Maps APIs.
In addition to the location’s latitude and longitude the Geocoding API also returns the original address broken down into separate components. This can be very useful if you’ve been given the full address and need to parse it into separate fields.
Geocoding API requests take the form:
https://maps.googleapis.com/maps/api/geocode/outputFormat?parameters
The output format can be either JSON or XML. I’ll be using JSON in all my examples.
The full list of parameters that can be used in the request is listed in the documentation referenced above, but the only ones required for our purposes are Address and API key.
Address – The street address that you want to geocode, encoded as a URL. Elements such as business name, suite, or floor numbers should be avoided. Street address elements should be delimited by spaces, not commas.
API Key – The key you generated when you set up your Google Maps account.
I’ll be building on the demo file from the biginning of the text. As you may recall that database is filled with Starbucks locations whose addresses I’ll be using in my examples.
Hopefully, I remembered to remove my API Key from the demo file before posting it with this article. You will need to generate an API Key of your own and enter it into the Settings table of the demo file before you can run these scripts.
The Get Latitude and Longitude from Google script demonstrates how to use the Geocoding API.
Here’s an example of how the request might be formatted and the result that the Geocoding API returns:
https://maps.googleapis.com/maps/api/geocode/json?address=2901%20W%20Broadway%20Suite%20117%20Columbia%20MO%2065203%20US&key=AAAAAAABBBBBBBCCCCCCCDDDDDEEEEEFFFFF
Result:
{
"results" : [
{
"address_components" : [
{
"long_name" : "117",
"short_name" : "117",
"types" : [ "subpremise" ]
},
{
"long_name" : "2901",
"short_name" : "2901",
"types" : [ "street_number" ]
},
{
"long_name" : "West Broadway",
"short_name" : "W Broadway",
"types" : [ "route" ]
},
{
"long_name" : "Columbia",
"short_name" : "Columbia",
"types" : [ "locality", "political" ]
},
{
"long_name" : "Missouri Township",
"short_name" : "Missouri Township",
"types" : [ "administrative_area_level_3", "political" ]
},
{
"long_name" : "Boone County",
"short_name" : "Boone County",
"types" : [ "administrative_area_level_2", "political" ]
},
{
"long_name" : "Missouri",
"short_name" : "MO",
"types" : [ "administrative_area_level_1", "political" ]
},
{
"long_name" : "United States",
"short_name" : "US",
"types" : [ "country", "political" ]
},
{
"long_name" : "65203",
"short_name" : "65203",
"types" : [ "postal_code" ]
},
{
"long_name" : "0669",
"short_name" : "0669",
"types" : [ "postal_code_suffix" ]
}
],
"formatted_address" : "2901 W Broadway #117, Columbia, MO 65203, USA",
"geometry" : {
"bounds" : {
"northeast" : {
"lat" : 38.9555688,
"lng" : -92.3810774
},
"southwest" : {
"lat" : 38.9553417,
"lng" : -92.38121199999999
}
},
"location" : {
"lat" : 38.95546700000001,
"lng" : -92.38111139999999
},
"location_type" : "ROOFTOP",
"viewport" : {
"northeast" : {
"lat" : 38.9567492802915,
"lng" : -92.3796293697085
},
"southwest" : {
"lat" : 38.9540513197085,
"lng" : -92.3823273302915
}
}
},
"place_id" : "ChIJ3UlygQe23IcR-hBaBkLhfs8",
"types" : [ "subpremise" ]
}
],
"status" : "OK"
}
As you can see, I get much more than just the latitude and longitude. For a full breakdown of the results, consult the API documentation.
The following script steps will allow us to snag the latitude and longitude from the result and put them in the proper fields:

As I mentioned before, having the latitude and longitude for the address simplifies our other calls to Google Maps. If you remember the final example at the beginning of the text, I made calls to the Google Maps URL to generate driving directions using the full address of each location. Now that I have the latitude and longitude for my addresses, I can replace this request:
https://www.google.com/maps/dir/?api=1&origin=
2901+W+Broadway%2C+Columbia+MO&destination=2400+Bernadette+Dr+
Columbia+MO&travelmode=driving&waypoints=1729+W+Broadway+Columbia+MO%7C
3100+W+Broadway+Columbia+MO
with this shorter one:
https://www.google.com/maps/dir/?api=1&origin=38.9638174%2C-92.3772164&destination=38.955467%2C-92.3811114&travelmode=driving&waypoints=38.9560651%2C-92.3643867%7C38.9532993%2C-92.38365
The maximum number of characters you can submit to an API using a URL is 2,048. Using the shorter latitude/longitude will increase the number of waypoints you can get directions for when using the Google Maps URL.
Having the latitude and longitude also allows me to calculate the distance between two points. All it takes is a little trigonometry. Use your favorite search engine to look for “FileMaker location distance custom function” and you will find several examples of how this can be done.
This is the distance “as the crow flies” and not the driving distance, but if your goal is to perform a search for all addresses within a certain number of miles from a location, this is exactly what you need.
Geocoding is a great API to get started with, it uses the GET method to communicate so it’s easy to set up the URL to submit. Likewise, the data it returns is limited to information about a single address, so there’s not a lot of variability in what you’re going to be getting back. Other APIs in the Google Maps toolbox are considerably more complex.
Read More: FileMaker and Adobe Sign Integration
Distance Matrix Routes API
Before I go on to my next example, I’d like to pause to say a few words about procrastination. Several months ago, when I proposed this article, the plan was to use the Distance Matrix API as my next example. I’ve used it on projects in the past and while it is cumbersome to use if you need to get the distance between multiple points, it makes for an OK example.
As I said, that was several months ago and in between then and now Google released the Routes API, which does everything the Distance Matrix does, only better. I did not feel good about putting out an article with obsolete information in it, but I didn’t have any experience with the new Routes API, so I’ve spent the last few days familiarizing myself with it. Learn from my example everyone. Eat your vegetables, brush your teeth, and get your blogs done when you say you will. If you don’t, they may turn into a lot more work than you planned on.
Read More: 6 Small Business Tech Trends for 2025
Now, on to the Routes API.
The Routes API takes an origin point and a destination and returns turn-by-turn driving directions, estimated travel time and the distance between the two points. It also allows you to include intermediate stops between the origin and destination, enabling you to map a multi-stop route.
This can be used to do things like calculate the total driving distance for an employee who makes in-person sales calls with clients. You can even use it to optimize the route. This API has a lot of features and I’d love to show examples of them all, but to avoid blowing another deadline I’ll settle for showing you how to make basic calls and let you take it from there.
Another difference between the Distance Matrix and Routes APIs is that while the Distance Matrix API uses the GET method to send the request, the Routes API uses POST. Using POST means that the parameters are sent in the headers or body of the request rather than in the URL itself. The POST method makes the call to the API more secure and potentially allows more information to be sent in the request, but it comes at a price.
Figuring out how to format POST requests is much more difficult than figuring out how to send a GET. Determining what goes into a header and what goes into the body/payload of the request takes a while and the rules that govern where you should use quotation marks takes some getting used to. It’s a lot like learning to ride a bike. You should go into this expecting to feel awkward and frustrated for a while, but once you finally master it you will be so proud of yourself that you may want to call your mom and yell, “look at me!!” I’m sure she will be impressed.
Read More: The Best 20 Data Analytics Tools in 2025
The minimum parameters you will need to call the Routes API are:
- Origin
- Destination
- API Key
- Field Mask (The list of items you want the API to return. To get them all you can send an ‘*’.)
There are several formats you can use to submit the origin and destination; I’ll be using latitude and longitude. I’m also going to include additional parameters to make sure the data comes back in the format I want. Also, this will make sure you have an example where the payload includes something besides JSON objects:
- Travel Mode
- Language
- Units
Based on Google’s documentation the request to the Routes API should look similar to this:
curl -X POST -d '{
"origin":{
"location":{
"latLng":{
"latitude": 37.419734,
"longitude": -122.0827784
}
}
},
"destination":{
"location":{
"latLng":{
"latitude": 37.417670,
"longitude": -122.079595
}
}
},
"travelMode": "DRIVE",
"languageCode": "en-US",
"units": "IMPERIAL"
}'
-H 'Content-Type: application/json' -H 'X-Goog-Api-Key: YOUR_API_KEY'
-H 'X-Goog-FieldMask: *'
'https://routes.googleapis.com/directions/v2:computeRoutes'
You can probably see where all the parameters fit in the request above, but how do you break it down so you can get them into the Insert from URL script step and send them the Routes API? There are multiple ways this can be done, but in my opinion, the key to success is to build it a piece at a time. When I have JSON objects that contain other JSON objects and I try to build it all at once it usually ends badly.
Let’s look at the Routes Report script in the example file.
I like to start out by getting all the information I’ll need set into variables:
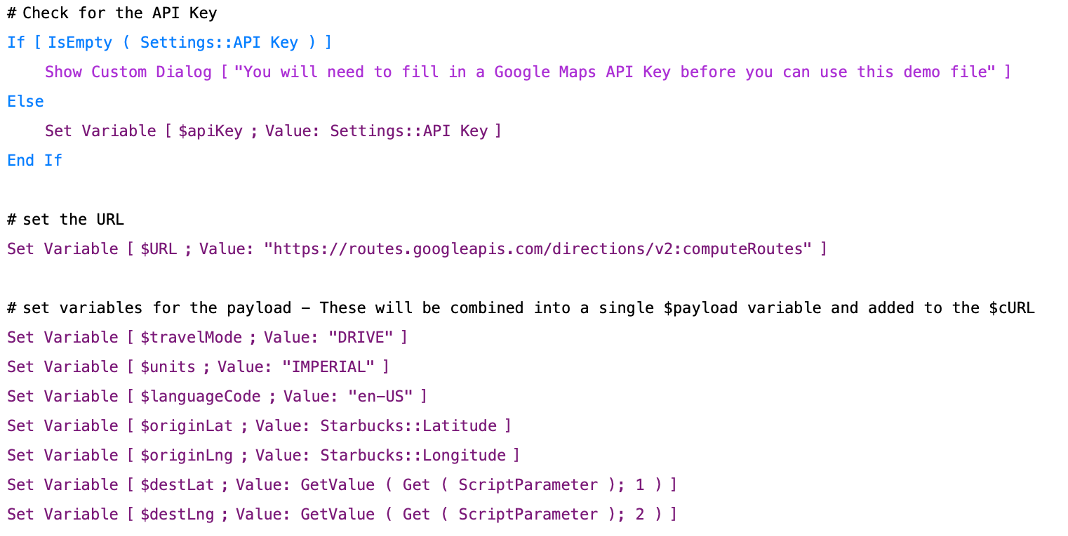
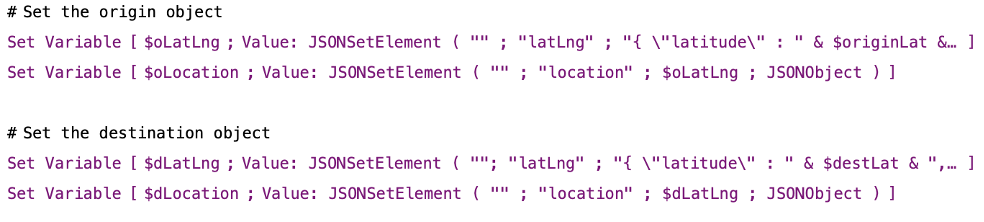
Then, I take the origin and destination and put them into their own variables. As you can see from the sample request above, the origin and destination are objects that contain a second object (location), which then contain a third (latLng). :
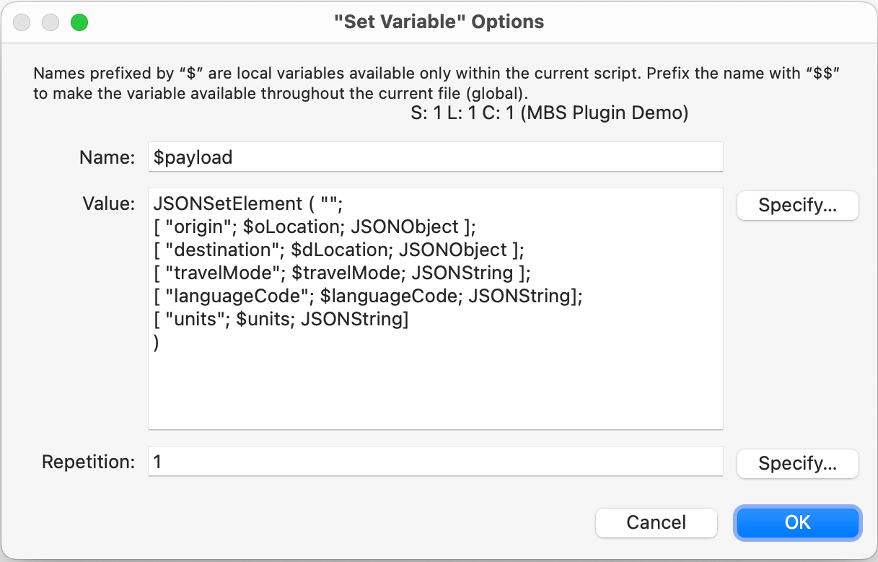
Now, I combine the origin and destination with the other parameters, not including the headers, in another JSON object and put all of that into a variable I call $payload.
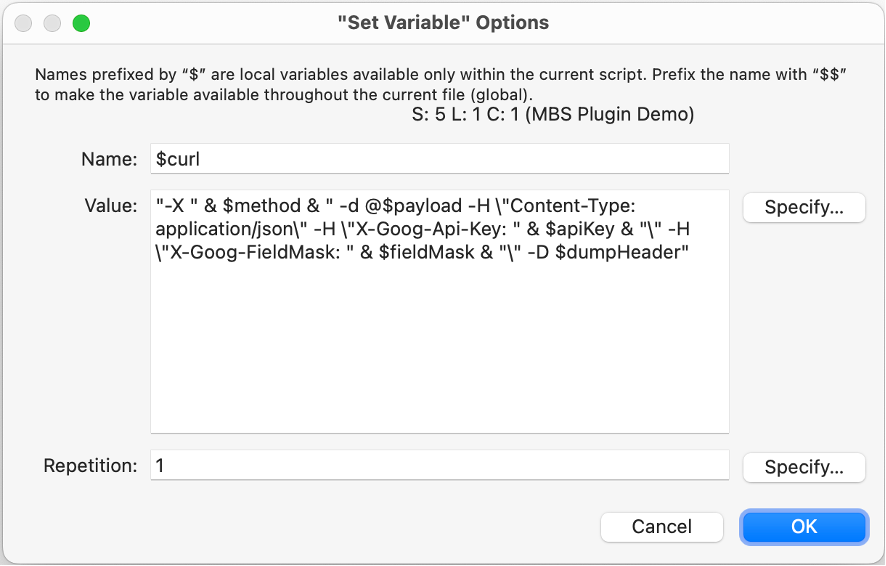
Then, I take the method (-X) and the headers (-H), combine these together with the $payload variable created earlier and put it all into a variable I call $cURL.
This, at last, will go into the Insert from URL script step. If you think using all the separate variables seems like a lot of nesting dolls being stacked one inside another, I don’t disagree with you, but this is the approach I’ve found works most reliably. If you are new to this, I’m also hoping this makes it easier to follow along.

You may have noticed I included something in $cURL that doesn’t appear in the example request shown above. The -D $dumpHeader is a curl option that dumps the received header information into the specified FileMaker variable ($dumpHeader). This is handy to use when you want to store the headers an API returns.
You can find more information about the curl options supported by the Insert from URL script step in the Claris documentation.
When you run this, you will get a LOT of data back. You can cut down on this by modifying the fieldMask parameter. I’ve provided an example of a modified fieldMask step in the Routes Report script and left it commented out so you can review it.
The Routes Report script doesn’t do anything very impressive with the data it gets back from the Routes API, but my goal here was to show how to access the data and let you decide how to use it. You may only want to do something simple with it and display the distance between the origin and the destination, but as you look over the response you get from the API I’m sure you will see that there is much more that can be done here. From building detailed reports, to providing turn-by-turn directions, there are a lot of possibilities. You can also add intermediate stops to the request that will let you map a much more complex route. The sky is the limit.
Read more: The Power of Integration and Automation for Business
Embarking on Your Journey
I’ve just scratched the surface on the Google Maps toolbox, but hopefully, this article gives you some ideas about the ways you can use Google Maps to enhance your FileMaker database and provide a more dynamic experience to your users. If you have any questions about what I’ve covered or how to implement it, feel free to reach out to us. We’re here to help.
Comments
Leave a comment

Built with you in mind
Speak to one of our expert consultants about making sense of your data today. During
this free consultation, we'll address your questions, learn more about your business, and
make some immediate recommendations.
Nice guide